An Extendable Obsidian Publish alternative using Next.JS
Publish your Obsidian Notes with a highly customizable Next.JS blog starter template. Features:
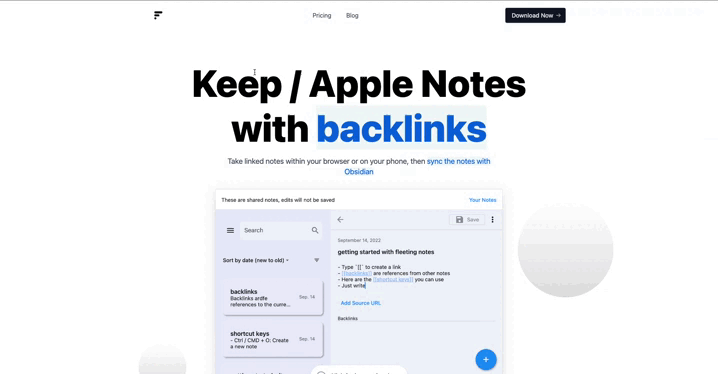
- Supports most Obsidian syntax (e.g. Link Previews, Links, etc.). Uses obsidian-export.
- URLs are based on folder structure
- Backlinks can be added outside of the markdown files (using the PreviewLink component)
- Full-text search
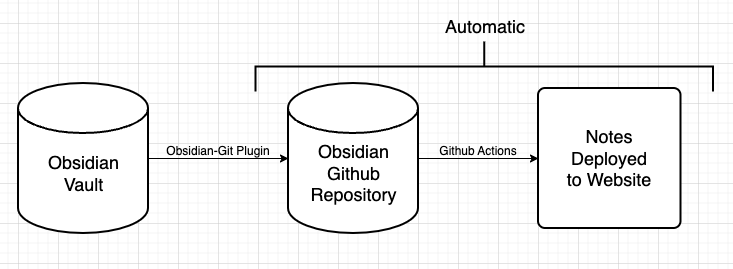
How it worksHow the Linked Blog Starter works1. Notes are updated in your Obsidian Vault 1. The Obsidian Git plugin pushes the notes to the remote repository. With the following command: Obsidian Git: Create backup 1. A github action is automatically triggered to deploy the notes using a specified template how-linked-blog-starter-works.png
- Notes are updated in your Obsidian Vault
- The Obsidian Git plugin pushes the notes to the remote repository. With the following command:
Obsidian Git: Create backup - A github action is automatically triggered to deploy the notes using a specified template
Getting Started
DemoAn Extendable Obsidian Publish alternative using Next.JSPublish your Obsidian Notes with a highly customizable Next.JS blog starter template. Features: * Supports most Obsidian syntax (e.g. Link Previews, Links, etc.). Uses obsidian-export. * URLs are based on folder structure * Backlinks can be added outside of the markdown files (using the PreviewLink component) * Full-text search How it works 1. Notes are updated in your Obsidian Vault 1. The Obsidian Git plugin pushes the notes to the remote repository. With the following command: Obsidian G
Additionally, you can deploy the example using Vercel or preview live with StackBlitz
Publish your Obsidian VaultPublish your Obsidian Notes with linked-blog-starterBy the end of this tutorial, you'll have a github repository that will automatically publish notes to your custom website everytime you upload new notes to the publish folder. Video: https://www.youtube.com/watch?v=rKSpK1dXn4E Step-by-step instructions to setup your blog 1. Fork the repository linked-blog-starter-md repository. This repository is where the publishing occurs fork-linked-blog-starter-md.png 1. Create a Vercel account then go to your dashboard then (Add New... > Project) 1.
Click the link above to find out how to publish your own notes!
Customize this templateDeploy a custom version of the linked-blog-starterBy the end of this tutorial, you will have a custom version of the linked-blog-starter that deploys to Vercel Fork the repository and get it to run locally First, we want to fork the linked-blog-starter repo, then install and run it locally. Note: Update https://github.com/matthewwong525/linked-blog-starter with your own repository link 1. Clone this repo by running git clone https://github.com/matthewwong525/linked-blog-starter 1. cd linked-blog-starter 1. npm install 1. npm run dev 1. Go
Here is an example of how I forked this repo to create a landing page for Fleeting Notes.